- git init – loob tühja koodivaramu. Aktiveerib giti selles kataloogis.
- git add <failid.txt> – lisab failid ootejärjekorda
- git commit – salvestab ootejärjekorras olevad failid ajalukku
- git commit -m “lühike tekst” –
- git status – hetke olek koodivaramus
- git log – näitab kõik commited, mis me teinud oleme
- git checkout HEAD filename – tühistab muudatused töökataloogis
- git reset HEAD filename – eemaldab failid ootejärjekorrast
- git reset commit_SHA – tühistab commiti SHA numbri järgi. HEAD liigub tagasi
- git branch – loetleb, kõik projekti harud
- git branch branch_name – teeb uue haru
- git checkout branch_name – liikumaks ühelt harult teisele
- git checkout master – liigub peamisse haruse
- git merge branch_name – ühe haru liitmine teisega
- git branch -d branch_name – haru kustutamine
- git clone aadress – teeb koopia teisest koodivaramust. Ka samas arvutis olevast.
- git remote -v – loetleb kõik Git projekti allikad (remotes)
- git fetch – toob allikast uuendused kohaliku koopiasse
- git merge origin/master – liidab toodud (fetch) muudatused kohaliku harusse
- git push origin branch_name – lükkab kohaliku haru muudatused peaharusse (origin)
- git pull – tõmbab teisest koodivaramust uuendusi
- git push – lükkab kohalikud muudatused teise koodivaramusse (serverisse)
- git qui –
git init
The word init means initialize. The command sets up all the tools Git needs to begin tracking changes made to the project.
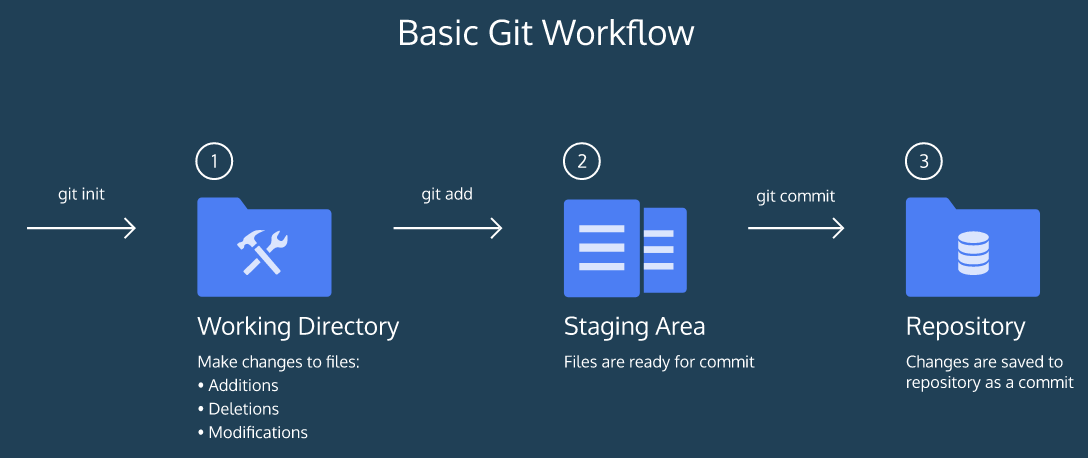
Git Workflow
- A Working Directory: where you’ll be doing all the work: creating, editing, deleting and organizing files
- A Staging Area: where you’ll list changes you make to the working directory
- A Repository: where Git permanently stores those changes as different versions of the project
git status
As you will be changing the contents of the working directory. You can check the status of those changes with: git init.
Untracked files means that Git sees the file but has not started tracking changes yet.
git add
In order for Git to start tracking file.txt, the file needs to be added to the staging area.
git add filename
git add file-1.txt file-2.txt
git diff
We can check the differences between the working directory and the staging area with:
git diff filename
What is in the staging area, as indicated in white. Changes to the file are marked with a + and are indicated in green.
git commit
A commit permanently stores changes from the staging area inside the repository.
git commit -m "Complete first line of dialogue"
Standard Conventions for Commit Messages: Must be in quotation marks; Should be brief (50 characters or less) when using -m

git log
Often with Git, you’ll need to refer back to an earlier version of a project. Commits are stored chronologically in the repository and can be viewed with: git log
In the output, notice:
- A 40-character code, called a SHA, that uniquely identifies the commit. This appears in orange text.
- The commit author (you!)
- The date and time of the commit
- The commit message

git show HEAD
In Git, the commit you are currently on is known as the HEAD commit. In many cases, the most recently made commit is the HEAD commit.
git show HEAD
The output of this command will display everything the git log commanddisplays for the HEAD commit, plus all the file changes that were committed.
git checkout
What if, before you commit, you accidentally delete an important line from file? Unthinkingly, you add file to the staging area.
git checkout HEAD filename: Discards changes in the working directory.
git checkout HEAD filename – will restore the file in your working directory to look exactly as it did when you last made a commit.
git reset
git reset HEAD filename
This command resets the file in the staging area to be the same as the HEAD commit. It does not discard file changes from the working directory, it just removes them from the staging area.
Just like retracing your steps on hike, Git enables you to rewind to the part before you made the wrong turn.
git reset commit_SHA
This command works by using the first 7 characters of the SHA of a previous commit. For example, if the SHA of the previous commit is 5d692065cf51a2f50ea8e7b19b5a7ae512f633ba, use: git reset 5d69206
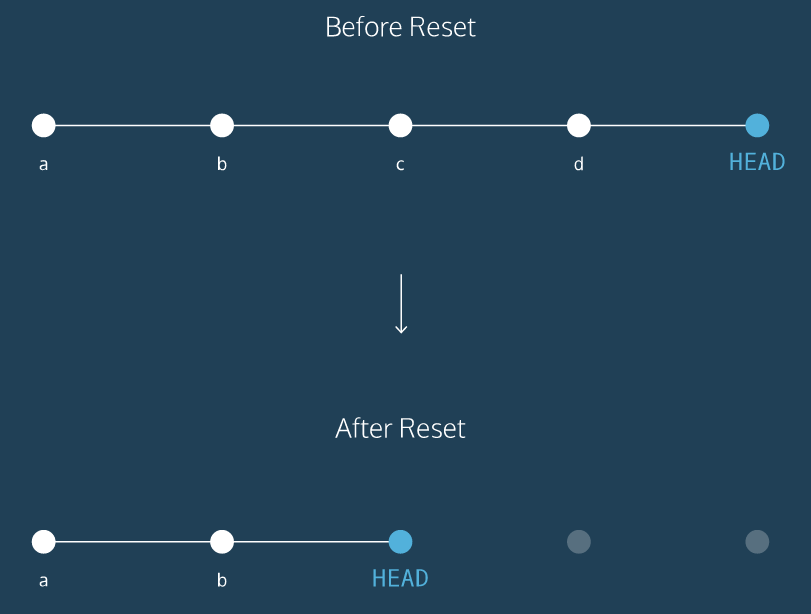
Before reset
HEADis at the most recent commit
After resetting:
HEADgoes to a previously made commit of your choice- The gray commits are no longer part of your project
- You have in essence rewound the project’s history
git branch
Up to this point, you’ve worked in a single Git branch called master. Git allows us to create branches to experiment with versions of a project.

To create a new branch, use:
git branch new_branch
You can switch to the new branch with:
git checkout branch_name
Once you switch branch, be now able to make commits on the branch that have no impact on master. You can continue your workflow, while master stays intact!
git merge
We can merging the branch into master with:
git checkout master // switch over to master
git merge branch_name // merge branch to master
merge conflict
What would happen if you made a commit on masterbefore you merged the two branches? Furthermore, what if the commit you made on master altered the same exact text you worked on in fencing? When you switch back to master and ask Git to merge the two branches, Git doesn’t know which changes you want to keep. This is called a merge conflict.
In the output, notice the lines:
CONFLICT (content): Merge conflict in resumé.txt Automatic merge failed; fix conflicts and then commit the result.
In the code editor, look at file. Git uses markings to indicate the HEAD (master) version of the file and the fencingversion of the file, like this:
<<<<<<< HEAD
master version of line
=======
fencing version of line
>>>>>>> fencing
Git asks us which version of the file to keep: the version on master or the version on branch. Delete the content you to not whant. Delete all of Git’s special markings including the words HEADand fencing. If any of Git’s markings remain, for example,>>>>>>> and =======, the conflict remains.
delete branch
In Git, branches are usually a means to an end. You create them to work on a new project feature, but the end goal is to merge that feature into the master branch. After the branch has been integrated into master, it has served its purpose and can be deleted.
The command will delete the specified branch from your Git project:
git branch -d branch_name
git clone
git clone remote_location clone_name
remote_locationtells Git where to go to find the remote. This could be a web address, or a filepath: /Users/teachers/Documents/some-remoteclone_nameis the name you give to the directory in which Git will clone the repository.
git remote -v
One thing that Git does behind the scenes when you clone is give the remote address the name origin, so that you can refer to it more conveniently.
You can see a list of a Git project’s remotes with the command:
git remote -v
git fetch
An easy way to see if changes have been made to the remote and bring the changes down to your local copy is with:
git fetch
This will not merge changes from the remote into your local repository. It brings those changes onto what’s called a remote branch.
git merge
Even though new commits have been fetched to your local copy of the Git project, those commits are on the origin/master branch. Your localmaster branch has not been updated yet.
Now we’ll use the git merge command to integrate origin/master into your local master branch.
git merge origin/master
Git workflow
- Fetch and merge changes from the remote
- Create a branch to work on a new project feature
- Develop the feature on your branch and commit your work
- Fetch and merge from the remote again (in case new commits were made while you were working)
- Push your branch up to the remote for review
Steps 1 and 4 are a safeguard against merge conflicts, which occur when two branches contain file changes that cannot be merged with the git merge command. Step 5 involves git push
git push
git push origin your_branch_name
will push your branch up to the remote, origin. From there, Origin owner can review your branch and merge your work into the master branch, making it part of the definitive project version.
git push -u origin master
